Websocket is a new standard protocol which has provided a way for client application to establish a two-way full duplex connection over a single TCP connection to the server and can be used in an HTML5-compliant browsers, thus eliminating the need to either use polling, or depend on third-party browser plugins. Well lets keep the discussions apart as the protocol is well covered here . I am here to cover an implementation of websocket based web application with eclipse Jetty . The application is a website chat , but the server side implementation can support native client as well if the client supports websocket protocol and standards.
ChatWebSocket implements Jetty's WebSocket , OnBinaryMessage , OnTextMessage interfaces which provides call backs like onOpen , onClose , onMessage methods which are useful to manage life-cycle of websocket.
When the users login successfully , they are able to see online users in the left hand side . Once they click on the online user , chat window opens at the bottom and they can chat. Right now I am supporting ten users(username- login1 to login10 , password - 123456 ) , but It can support much more users based on the load testing done on server , which is I am currently spending time on.
I have a LoginController which validates and authenticates user login. After successful authentication it does two things .
For this Application I am following one life-cyle which I am going to share later as I am preparing the UML diagrams. But application code has been uploaded to my GIT hub repo.
STEPS TO DEPLOY
1) Download eclipse jetty from here. I am using version 8.1.12.v20130726.
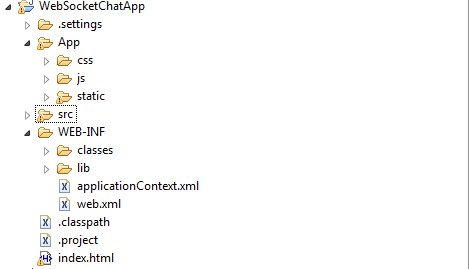
2) Download following jars as well for logging. slf4j-log4j12-1.6.6.jar , slf4j-api-1.6.6.jar , log4j-1.2.17.jar 3) The app is a WebApp , so directory structure should be followed (war file can be created out of it or below deplyoment structure can be followed.).
Below can be used : Under webapps directory of ${jetty.home}:
WebSocketChatApp---|
|--App
|--WEB-INF--|
|--classes
|--lib
|--applicationContext.xml
|--web.xml
4) For logging create a ${jetty.home}/lib/logging/ directory and place the three JAR files in step 2. Next you can follow this tutorial.
5) Then start the server . Go to ${jetty.home} , use command : java -jar start.jar
6) Launch the APP from browser. http://localhost:8080/WebSocketChatApp/index.html#login .
Some Screenshots from Different browser:


Download the full source Code here
Please add valuable feedback/comments about this post .
Thanks.
Development environment :
- IDE - Eclipse IDE.
- Web server - Eclipse jetty distribution-8.1.12.v20130726 ( Download Link )
- OS - Ubuntu Lucid , Windows 7
- Client framework - Backbone.js , Require.js , Jquery
Code Insight :
The high level insights of code walk through will be covered . Later I will share and explain the UML diagrams that I have prepared. The touch point of the application is WebsocketChatServlet which extends Jetty's WebSocketServlet which returns the ChatWebsocket from WebsocketPool.
public class WebsocketChatServlet extends WebSocketServlet{

    /**
     *
     */
    private static final long serialVersionUID = 1433567677561132601L;

    private ChatWebsocketFactory chatWebsocketFactory;

    @Override
    public WebSocket doWebSocketConnect(HttpServletRequest arg0, String arg1) {
        ApplicationContext applicationContext=WebApplicationContextUtils.getWebApplicationContext(getServletContext());
        this.chatWebsocketFactory=(ChatWebsocketFactory)applicationContext.getBean("chatWebsocketFactory");
        return chatWebsocketFactory.getChatWebsocket();
    }

    public ChatWebsocketFactory getChatWebsocketFactory() {
        return chatWebsocketFactory;
    }
    public void setChatWebsocketFactory(ChatWebsocketFactory chatWebsocketFactory) {
        this.chatWebsocketFactory = chatWebsocketFactory;
    }


}
ChatWebSocket implements Jetty's WebSocket , OnBinaryMessage , OnTextMessage interfaces which provides call backs like onOpen , onClose , onMessage methods which are useful to manage life-cycle of websocket.
public class ChatWebsocket implements WebSocket,OnBinaryMessage,OnTextMessage{

    private Connection connection;
    private BlockingQueue<String> blockingQueue;
    private WebsocketPool pool;
    private static final Logger LOGGER=Logger.getLogger(ChatWebsocket.class);

    public ChatWebsocket(BlockingQueue<String> blockingQueue,WebsocketPool pool){
        this.blockingQueue=blockingQueue;
        this.pool=pool;
    }

    @Override
    public void onClose(int arg0, String arg1) {
        LOGGER.info("ChatWebsocket.onClose()");
        this.pool.returnToPool(this);
    }

    @Override
    public void onOpen(Connection arg0) {
        LOGGER.info("ChatWebsocket.onOpen()");
        this.connection=arg0;
        try {
            this.connection.sendMessage(AppUtils.prepareConnectInitResponse(String.valueOf(this.hashCode())));
        } catch (IOException e) {
            e.printStackTrace();
        }
    }

    @Override
    public void onMessage(byte[] arg0, int arg1, int arg2) {
        LOGGER.info("ChatWebsocket.onMessage()");

    }

    @Override
    public void onMessage(String arg0) {
        LOGGER.info("ChatWebsocket.onMessage()::::"+arg0);
        try {
            this.blockingQueue.put(arg0);
        } catch (InterruptedException e) {
            e.printStackTrace();
        }
    }

    public void sendMsg(String Msg) {
        try {
            this.connection.sendMessage(Msg);
        } catch (IOException e) {
            e.printStackTrace();
        }
    }
}
When the users login successfully , they are able to see online users in the left hand side . Once they click on the online user , chat window opens at the bottom and they can chat. Right now I am supporting ten users(username- login1 to login10 , password - 123456 ) , but It can support much more users based on the load testing done on server , which is I am currently spending time on.
I have a LoginController which validates and authenticates user login. After successful authentication it does two things .
- Send successful response with all currently logged in users.
- Notify all other current logged in users about the user that has logged in.
Login is currently implemented with REST.
@Path("/login")
public class LoginController {

    @Context
    private ServletContext context;

    @POST
    @Consumes({MediaType.APPLICATION_JSON,MediaType.APPLICATION_XML})
    @Produces({MediaType.APPLICATION_JSON,MediaType.APPLICATION_XML})
    public LoginResponse doLogin(LoginRequest loginRequest) {
        LoginResponse loginResponseObject=new LoginResponse();
        boolean isAuthencated=authenticateUser(loginRequest);
        if (isAuthencated) {
            loginResponseObject.setStatus(0);
            Set<String> users=Memorizers.getUserVsConnectorId().keySet();
            List<Profile> usersList=new ArrayList<Profile>();
            for (String string : users) {
                Profile userProfile=new Profile(true,string);
                usersList.add(userProfile);
            }
            loginResponseObject.setProfiles(usersList);
            notifyOnlineUsers(loginResponseObject.getProfiles());
        }else{
            loginResponseObject.setStatus(-1);
        }
        return loginResponseObject;
    }

    private boolean authenticateUser(LoginRequest LoginRequest){
        if (isValidLogin(LoginRequest.getUsername(), LoginRequest.getPassword())) {
            String connectorId=Memorizers.getUserVsConnectorId().get(LoginRequest.getUsername());
            if (connectorId==null) {
                Memorizers.getUserVsConnectorId().putIfAbsent(LoginRequest.getUsername(), LoginRequest.getConnectorId());
            }
            return true;
        }
        return false;
    }

    private void notifyOnlineUsers(List<Profile> profiles){
        ApplicationContext applicationContext=WebApplicationContextUtils.getWebApplicationContext(context);
        BlockingQueue<WebsocketResponse> outboundQ=(LinkedBlockingQueue<WebsocketResponse>)applicationContext.getBean("outBoundQ");
        Set<String> users=Memorizers.getUserVsConnectorId().keySet();
        List<Profile> usersList=new ArrayList<Profile>();
        for (String string : users) {
            Profile userProfile=new Profile(true,string);
            usersList.add(userProfile);
        }
        NotifyLoggedInUsers loggedInUsers=new NotifyLoggedInUsers(AppInfo.SUCCESS,new ArrayList<String>(Memorizers.getUserVsConnectorId().values()), profiles);
        loggedInUsers.setLoggedInUsers(usersList);
        System.out.println("Notifying online users!!");
        PoolExecutors.addTaskToPES(loggedInUsers, outboundQ);
    }

    private boolean isValidLogin(String userName,String password) {
        String loginRegex="(login)([1-9]|10)";
        if (userName!=null && password!=null && userName.matches(loginRegex) && "123456".equals(password)) {
            return true;
        }

        return false;
    }
}
For this Application I am following one life-cyle which I am going to share later as I am preparing the UML diagrams. But application code has been uploaded to my GIT hub repo.
Now some client
I have implemented client side using Backbone.js , Require.js , Jquery , HTML5 websocket. Its a working code. Still some features are under development , but its ready for you to start If you are looking for a service or application .
The first we launch the url , it loads all the modules and does necessary initialization.
- Routing initialization for backbone views . Currently I have two views. Login View and ChatRoom View.
- WebscoketClient initialization. Creates HTML5 websocket and onmessage callback retrieves the connectorId which is saved to a Backbone model . connectorId is generated by server and maintained at client for all the communications exchanged over websocket.
requirejs.config({

    paths:{
        jquery: 'lib/jquery/jquery-1.7.1',
        jqueryUI:'lib/jquery/jquery-ui-1.8.23.custom.min',
        underscore:'lib/underscore/underscore-min',
        backbone:'lib/backbone/backbone-min',
        handlebar:'lib/handlebar/Handlebars',
        text:'lib/text/text',
        chatWidget:'lib/plugins/jqueryChatBox/jquery.ui.chatbox',
        chatBoxManager:'lib/plugins/jqueryChatBox/ChatBoxManager'
    }
});

require(['scripts/BootStrap'],function(BootStrap){
    console.log('BootStrap loaded!!');
    BootStrap.initialize();
})
WebSocketChatApp.js
define( ['jquery',  'underscore', 'backbone', 'handlebar',
        'scripts/login/LoginView','scripts/chatroom/ChatroomView','scripts/common/WebsocketClient'  ], function($, _,
        Backbone, Handlebars, LoginView,ChatroomView,connector) {

    var views={};
    var AppRouter = Backbone.Router.extend( {
        routes : {

            'login' : 'login',
            'chatroom' : 'chatroom',

            '*actions' : 'defaultAction'
        }
    });

    var initialize = function() {
        var app_router = new AppRouter();

        app_router.on('route:login', function() {
            if (views['loginView']) {
                views['loginView'].close();
            }
            var loginView = new LoginView({el:'#appContainer'});
            views['loginView']=loginView;
            loginView.render();
        });

        app_router.on('route:chatroom', function() {
            var chatroomView = new ChatroomView({el:'#appContainer'});
            chatroomView.render();
        });
        app_router.on('route:defaultAction', function(actions) {

            console.log('No route:', actions);
        });

        $(document).on('routeEvent',function(event,responseObj){
            window.Map['loginResponse']=responseObj;
            app_router.navigate('chatroom',{trigger: true});
        })
        Backbone.history.start();
        connector.start('ws://localhost:8080/WebSocketChatApp/samplewebsocketchat');
    };

    window.Map={};

    return {

        initialize : initialize
    }
})
BootStrap.js
define(['scripts/common/CommonModel'],function(commonModel){
    var connectionObj=null;
    var connectorCache={};
    var listeners={};
    start=function(wsURI){
        if (connectionObj==null) {
            connectionObj=new WebSocket(wsURI);
        }
        connectionObj.onopen=function(event){handleOpen(event);};
        connectionObj.onclose=function(event){handleClose(event);};
        connectionObj.onmessage=function(event){handleMessage(event);};
        connectionObj.onerror=function(event){handleError(event);};
    }

    function handleOpen(event) {
        console.log('Connection Opened!!');
    }

    function handleClose(event) {
        console.log('Connection Closed!!');
        clearInterval(timerTask);
        connectionObj=null;
    }

    function handleMessage(event) {
        console.log('handleMessage::'+event.data);
        var msgObj=JSON.parse(event.data);
        if (msgObj.responseId==='ConnectInit') {
            handleConnectionInit(msgObj);
        }else if (msgObj.responseId==='HandShakeRes') {
            handleHandShake(msgObj);
        }else if (msgObj.responseId==='Pong') {
            handlePONG(msgObj);
        }else{
            dispatchToListener(msgObj);
        }

    }

    function handleConnectionInit(msgObj){
        connectorCache['connectorId']=msgObj.connectorId;
        commonModel.set('connectorId',msgObj.connectorId);
        var handShakeReq={
                requestId:'HandShakeReq',
                connectorId:connectorCache['connectorId'],
                userId:'',
                friendList:[]
        }
        connectionObj.send(JSON.stringify(handShakeReq));
    }

    var timerTask;

    function handleHandShake(msgObj){
        timerTask=setInterval(function() {
            sendPING();
        },60000);
    }

    function sendPING() {
        var connectorId=connectorCache['connectorId'];
        var pingReq={
                requestId:'Ping',
                connectorId:connectorCache['connectorId'],
                userId:'',
                friendList:[]
        }
        connectionObj.send(JSON.stringify(pingReq));
    }

    function handlePONG(msgObj){
        //console.log('Yet To Handle!!');
    }

    function dispatchToListener(msgObj) {
        if (listeners && listeners[msgObj.responseId]) {
            listeners[msgObj.responseId].handleMsg(msgObj);
        }
    }

    function handleError(event) {
        console.log('Connection Opened!!');
    }

    registerListener=function(serialID,handler){
        listeners[serialID]=handler;
    }

    sendMsg=function(reqObj){
        connectionObj.send(JSON.stringify(reqObj));
    }

    return {

        start:start,
        registerListener:registerListener,
        sendMsg:sendMsg
    }
})
WebsocketClient.js
Deployment Of Web Application
The deployment in eclipse Jetty is very similar to Apache Tomcat . You can either create a web archive(war) file or simply deploy the web application project as I did under the 'webapps' folder of Jetty's home directory(${jetty.home}).
1) Download eclipse jetty from here. I am using version 8.1.12.v20130726.
2) Download following jars as well for logging. slf4j-log4j12-1.6.6.jar , slf4j-api-1.6.6.jar , log4j-1.2.17.jar 3) The app is a WebApp , so directory structure should be followed (war file can be created out of it or below deplyoment structure can be followed.).
Below can be used : Under webapps directory of ${jetty.home}:
WebSocketChatApp---|
|--App
|--WEB-INF--|
|--classes
|--lib
|--applicationContext.xml
|--web.xml
4) For logging create a ${jetty.home}/lib/logging/ directory and place the three JAR files in step 2. Next you can follow this tutorial.
5) Then start the server . Go to ${jetty.home} , use command : java -jar start.jar
6) Launch the APP from browser. http://localhost:8080/WebSocketChatApp/index.html#login .
Some Screenshots from Different browser:
Download the full source Code here
Please add valuable feedback/comments about this post .
Thanks.


